The System Email function allows a company to set up Email configuration (End of Period, Claims or Policy) in one (1), centralized location as opposed to doing this in different locations in the Diamond System Editor.
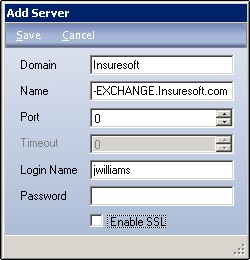
First, you must add your Email Server by clicking Add on the Email Server List toolbar to display the Add Server screen.

Domain: This is the domain (or region) of your Email Server (e.g., Insuresoft).
Name: This is the name of your server that sends Email Notifications (e.g., AL-EXCHANGE.Insuresoft.com).
Port: You do not have to make an entry in this field; defaults blank. Each time an Email Server is added, this number increments by one (1).
Timeout: Protected field.
Login Name: The user's login name for the Email Server.
Password: Optional; corresponding password for the Email Server's login name.
Enable SSL (Secure Sockets Layer): If you wish to encrypt (hide) your email traffic, select the field and place a check mark in it; otherwise, leave blank.
When finished, select Save to retain your entries and add the server to the List View. You are now ready to configure your email types and addresses.
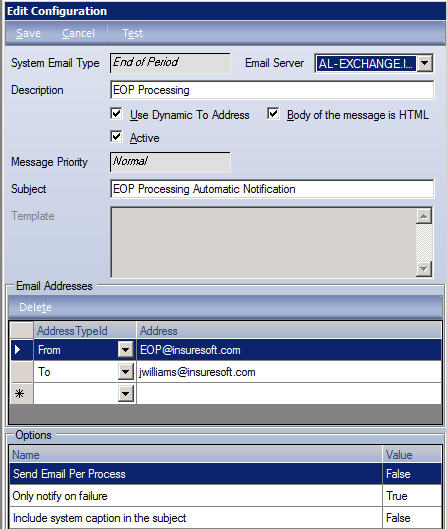
From the System Email Configuration List toolbar, click Add.

System Email Type: Select the Email Notification Type form the combo list: End of Period, Claims, Policy, Queued Policy Export, Error Log Upload, Scheduler Runner Job, DHI Driver History, Inc.) Alert, Policy Task Transfer or Forgot Login / Password.
Email Server: Choose the corresponding server from the combo box. The list displayed contains the server (s) entered when adding the Email Server List.
Description: Required; enter a brief text description for what you would like to call the configuration. (For testing purposes, you can enter a Subject as shown above.)
Use Dynamic To Address: Click in this field to place a check mark.
Body of the Message is HTML: Click in this field to place a check mark.
Active: The field defaults with a check mark. This means your Email Server / System Email Configuration is in use.
Message Priority: Select from the combo box a priority for the email: High, Normal or Low.
Subject: The entry made here is displayed in the Subject line in the email. If blank, then the default Subject will display. Please Note: This will be different depending on the System Email Type used. For example, End of Period will be different than the Policy or Claims Notification.
Email Addresses Section
Users (Count #): If you have chosen to add Policy Task Transfer as a configuration, select this button to return the Available Users screen. Opposite each user you wish to add to receive an automatic Email Notification when a Policy Task or Diary item is assigned, select to place a check mark in the Selected Column. Once all users have been selected, click Close. When the Add Configuration screen returns, the number of users is shown.
Address Type ID: Choose the type of email address from the following: N/A, From, To CC, Blind CC or Reply.
Address: Click in the Address field. Enter the name of the email address of the user to whom the email will be sent / or who it's from. (For testing purposes, you will want to add your name as the recipient.)
Policy Task Transfer Configuration Note: A "To" and "From" Email Address are both required for most configurations; however, if you are adding a Policy Task Transfer configuration, you only need to add the "From" Address Type ID / Address. Do not add a "To" Address Type ID / Address. The system will return an error violation. Also, if a user was added to the list, and has since been made "Inactive," they will be shown in red. "Inactive" users will not receive Email Notification at run time.
When finished, select Save to retain your entries and add the information to the List View.
For End of Day, End of Month and End of Period Processing, you can set up a variety of email notification options by right clicking on the option. These are:
When the option, “Send per Process,” is enabled (True) and the “Only Notify on Failure” option is also enabled (True), the system:
Will not send an email that EOP has started.
For each process that fails, the user will receive an email.
Will send an email that EOP has completed and lists only the process or processes that fail.
When the option, “Send per Process,” is enabled (True) and the “Only Notify on Failure” option is disabled (False), the system:
Will send an email that EOP has started.
Will send an email for each process.
Will send an email that EOP has completed that lists all processes.
When the option, “Send per Process,” is disabled (False) and the “Only Notify on Failure” option is enabled (True), the system:
Will not send an email that EOP has started.
Will send an email that EOP has completed that only lists only the processes that failed.
(Note: This is the option shown in the example above.)
When the option, “Send per Process,” is disabled (False) and the “Only Notify on Failure” option is disabled (False), the system:
Will send an email that EOP has started.
Send an email that EOP has completed that lists all processes.
The option, "Include System Caption in the Subject," gives your company the ability to distinguish which environment (Test or Production) is generating the EOP Email Notifications. This will allow the system caption (specified by the "Caption" system setting in the Diamond folder) to be included in the subject line of each email message. If you are using this in a Test environment, add an indicator (e.g. "** Test **") to the system caption and set this to "True."
Now that both the Email Server List and the System Email Configuration List have been saved and added to their List Views, you will want to test and ensure an email is sent.
Click the Refresh button on both the Email Server List AND the System Email Configuration List.
From the System Email Configuration List toolbar, click Test.
If successful, you will receive a validation: "Test successful." An Email is then sent to you stating: "This is a test message sent from the Diamond System."
If the test fails, make sure that BOTH the Email Server List AND the System Email Configuration List information is correct by using the Edit button. Make any corrections and ensure you Save your changes. Click BOTH the Refresh buttons and click Test again.
To make changes to any of the Email Servers or System Email Configurations:
Highlight the item in the List View.
Click Edit.
From the Edit screen, make your changes.
Click Save to retain your entries.
Select Refresh to clear old entries / selections.
If you are deleting an Email Server List, you must delete any items linked to that server in the System Email Configuration List first.
Highlight the item in the List View.
Answer Yes to the question: "Delete the currently selected server / configuration item?"
The item is removed from the List View.